|
|
|
Références
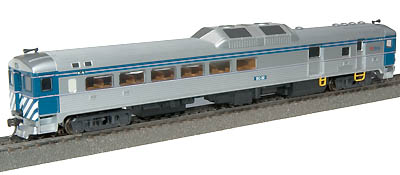
du modèle - Model reference:
Proto
1000 # 239738 (BC Rail # 30)
Rayon
minimum possible - Minimum possible radius:
R1.
Description:
Profitant
d'une aubaine chez l'un de nos fournisseurs favoris au Québec,
j'ai acheté cet autorail à 50 % du prix habituel.
Cela faisait quelques années que je me posais la question
de savoir si ce modèle Proto 1000 pouvait être
converti pour circuler sur des voies Märklin. Voici la
réponse ...
I took the opportunity of a 50 % discount to buy this railcar
at one of our favorite hobbyshop in Quebec. I was wondering
for years if that Proto 1000 model could be converted to run
on the Märklin system. Here is the answer ...
Liens
- Links:
Life-Like/Proto
(Walthers)
Uhlenbrock
Photos
- Pictures:
BC
Rail RDC's # 30 and 31 at Lillooet, BC, in July 1997
BC
Rail RDC's at Seton Lake, BC, in July 1997
|
|
|
|
|
Les
.
There
was a good news and a bad news. The good news was that it would
be easy to install a decoder as reported on Bevis
King's website or on Tony's
Train Exchange page. The bad news was that is would not
be easy to install the slider on the unpowered truck.
Anyway,
I have found a way to solve this problem. The problem was that
the bottom cover of the truck comes almost flush with K-Track
turnout pukos. So it was not possible to add a slider below
it as there was no clearance enough.
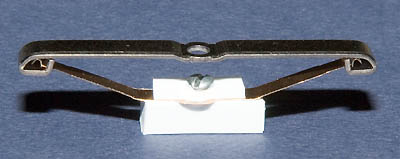
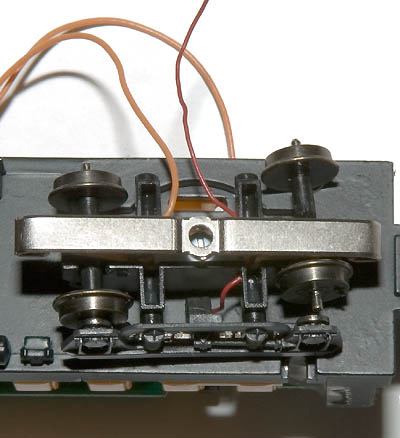
My
option was then to put the slider inside the truck and remove
the bottom cover. Of course, I had to proceed with some modifications
of the truck and its components. In order to put the slider
inside the truck, a new support had to be patented and the upper
part of the slider modified as shown on the first picture.
Two
Evergreen strips have been cut to make the new support. A small
screw holds the assembly as it can be seen on the two next pictures.
|
DEBUT
DE PAGE - TOP OF PAGE
|
|
|
|
Les
.
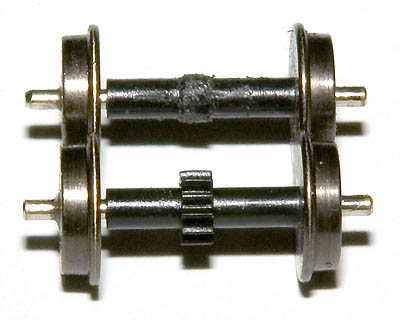
In
the meantime, I had filed the dents of the two wheels sothat
they should not interfer with the slider inside the truck.
|
DEBUT
DE PAGE - TOP OF PAGE
|
|
|
|
Les
.
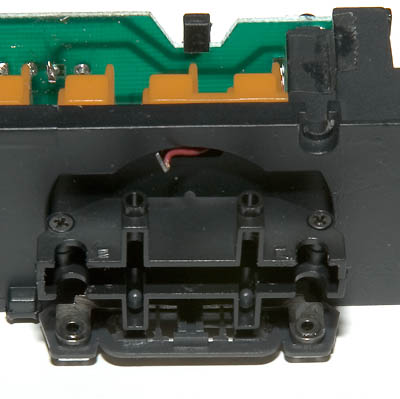
Both
halves of trucks are hold together by screws. The inside of
the unpowered truck is empty. Bottom cover is needed to hold
the truck sideframes, but I have found a solution for this because
I had the intention to do not use the cover anymore.
Here
are some pictures of the unpowered truck prior any modification.
One sideframe has been removed.
|
DEBUT
DE PAGE - TOP OF PAGE
|
|
|
|
Les
.
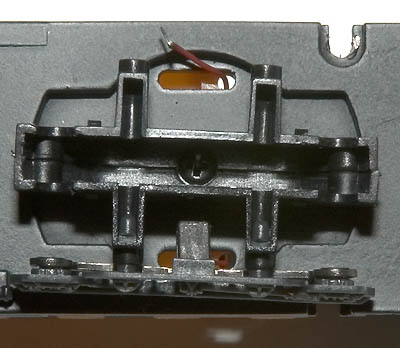
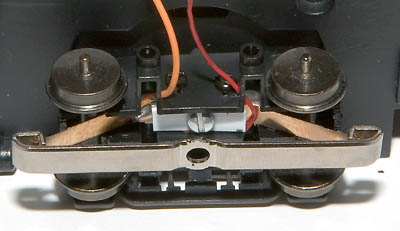
I
had installed the slider assembly into the truck. Prior this,
I had soldered a wire to the slider and bored a hole in one
of the truck four legs to let it go outside (orange wire on
the pictures).
The
slider assembly was attached to the truck by means of two screws
that you can see on the lateral face of the truck.
Both
truck ends have been carved a little bit sothat the slider can
move without interference. Wheel axles have been filed more
than you can see on the above picture to avoid to much rubbing
on the slider springs. At last, I have bored two holes in one
leg each side of the truck to let the sideframe interconnexion
wire (red) go through them.
|
DEBUT
DE PAGE - TOP OF PAGE
|
|
|
|
Les
.
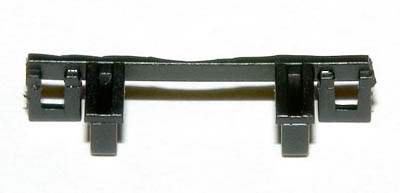
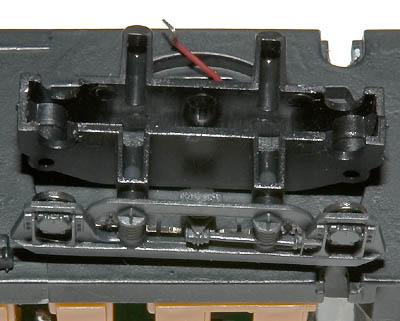
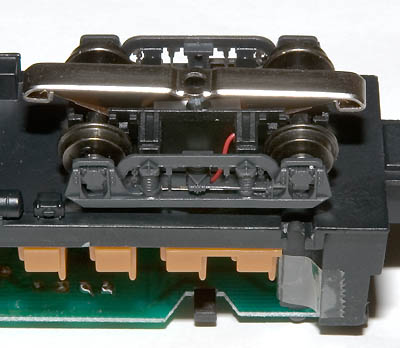
I
have then cut the bottom cover in order to save both sides with
their legs and clips as you can see on the picture.
|
DEBUT
DE PAGE - TOP OF PAGE
|
|
|
|
Les
.
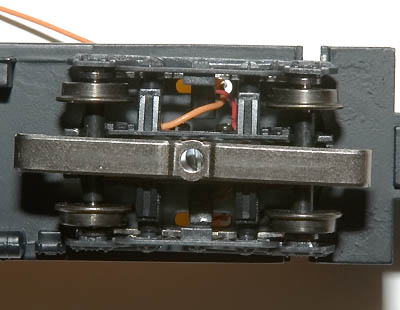
Surprisingly,
both remains of the bottom cover can hold their position without
any gluing. I just had to carve their inner side to make room
for the slider. I did some preliminary tests on a K-Track turnout
and it worked even if the limit was reached when the higher
pukos pushed the slider against the truck body. This was less
critical on C-Track turnouts.
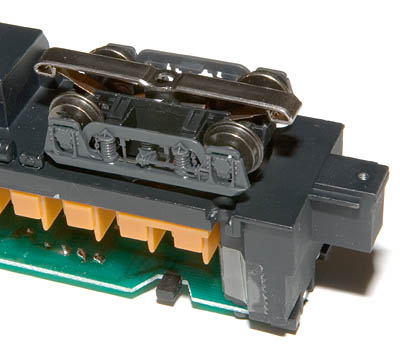
Pictures
show the completed slider installation .
|
DEBUT
DE PAGE - TOP OF PAGE
|
|
|
|
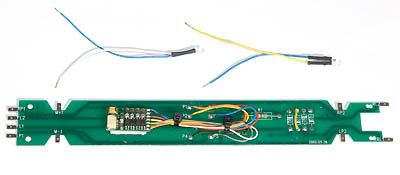
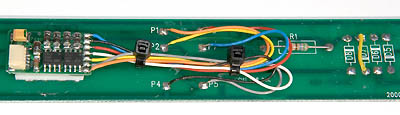
Les
.
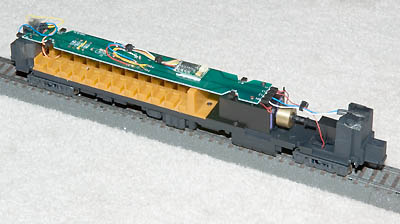
Original
components were removed from PCB and Uhlenbrock 76400 decoder
was installed. Jumpers were soldered at the place of diodes
D4 and D7. D4 jumper was installed on the solder side sothat
it would not interfer with decoder installation.
A
560 Ohm resistor replaced the original 300 Ohm (this new value
was calculated for the LED's under a 15 VDC supply). This is
totally similar to a DCC conversion up to this point.
|
DEBUT
DE PAGE - TOP OF PAGE
|
|
|
|
Les
.
Kadee
# 5.
Then
came the first test on a C-Track circuit ...
...
But both lights didn't work ! I had supposed that the blue wires
were the negative. A quick measure with my multimeter proved
me the contrary. So I inverted wires of the lights at both sides
at it worked fine then.
|
DEBUT
DE PAGE - TOP OF PAGE
|
|
Rapport
de test en voie - Running Test Report
|
|
Les
.
Running
test report :
The
powered wheels had the tendency to slip when slider was on an
elongated turnout. But wheels were a little bit greasy due to
factory overoiling of powered truck. After cleaning, things
were going much better on C tracks but the RDC still slips on
K track elongated turnouts if running at low speed due to higher
pukos and limited slider clearance. I think that adding some
weight could help. I will do this later.
On
C-Tracks :
| |
R1
curves are possible without problem but do not place accessories
too close from track !
24611/24612
: derails when going unpowered truck first. No problem
when going powered truck first.
24671/24672
: cannot take inner curve in both directions. No problems
on outer curve.
24711/24712
: no problems.
24624
: not tested.
|
On
K-Tracks :
| |
2265/2266
: derails when going unpowered truck first. No problem
when going powered truck first. Bottom details jam in
turnout lever !
22715/22716 : no problems if you except the slipping issue.
2275
: no problems when deviated but derails when going straight
!
2260
: not tested.
2268/2269
: not tested but similar problems as for 24671 and 24672
can be expected.
|
|
DEBUT
DE PAGE - TOP OF PAGE
|
|
Liste
des pièces - Parts List
|
|
En
ouvrant le dossier ci-après, vous disposerez de l'inventaire
des pièces utilisées pour réaliser cette
locomotive.
Le
coût global de la locomotive (sans la ristourne de 50
%) est de CDN$ .
Le
nombre d'heures de travail qui a été nécessaire
pour la conversion est estimé à 8 heures.
Dossier
PDF
|
DEBUT
DE PAGE - TOP OF PAGE
|
Voyez
aussi les commentaires sur le forum Märklin-Users.net :
Comments
on Märklin-Users.net forum :

Pierre
GILLARD, octobre/October 2006.
|